Roasting a Turkey
How to make a turkey that is
moist and delicious, every time
Roasting a Turkey
How
to make a turkey that is
moist and delicious, every time
First posted 2004; Revised November 2021
|
Thousands of people use this page each year. More technique than recipe, it tells you what you need to achieve a juicy, tender bird with golden skin and gravy that's as good as the meat. This is a loooong page but fear not: it's in order, with the most important tips at the top, winding its way into the depths of fanatic minutiae and food scientist fantasies.
It's all about the turkeyOver 90% of American households have turkey on Thanksgiving. Over the course of a year, each of us, on average, eats a whole turkey. (I must be eating a couple of vegetarians' share.) Many of them are roasted badly, with squeaky, dry breast meat, and greasy, salty, gravy. It's not surprising. With its different types of meat, tacked on to an oddly shaped, heavy frame that's not much smaller than your oven, a turkey is not an easy thing to roast well — and many recipes give poor, outmoded advice. It does not have to be that way. Turkey heaven (by which I mean, heaven for you and your guests, and presumably, a month or so prior for the turkey) takes just a little knowledge and a few simple practices. Here are the most important hints for roasting the perfect turkey. If you are
not
as obsessed as I am, you don't need to follow every tip. The list is
in order of importance. Just start with
number 1 and continue as far as you can stand. But you must do
number 1 and number 2 is very important, too. Ah, so is 3. After that,
it's small stuff. Well,
smallish ... mmm, told you I am obsessed! Contents
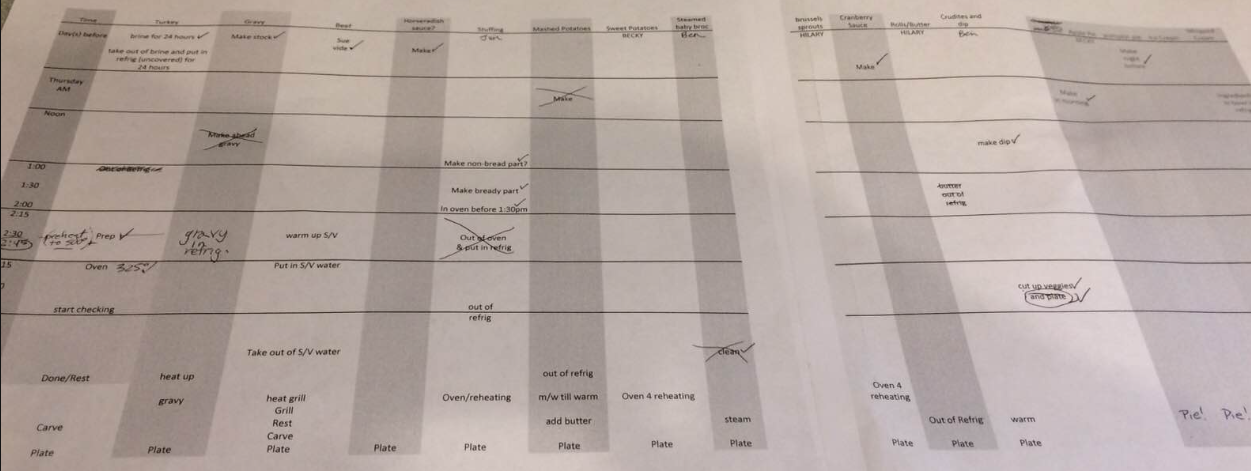
TimetableIf today is Wednesday or (panic!) Thursday, run out and buy a pre-brined turkey (see Buying a Good Turkey). A thawed bird is best but if all you can find is a frozen bird, no worries. Quick-thaw in a water bath (see below). If there's time, place the prepared turkey in the refrigerator, uncovered, to air dry overnight. If it's Monday or Tuesday, you can get any thawed turkey (and perhaps even a frozen bird, since you can thaw and brine at the same time). If it's unbrined, you can wet brine it (see Brine the Bird!) and still have a day to air dry it. If it's Saturday or Sunday, you have time to dry-brine, then air-dry for one day. You can even start with a partly frozen bird and thaw it while you brine.
How to plan a meal! (Courtesy Sue Miller and Judy Rand) ThawingIt takes several days to thaw a turkey the easiest and safest way, in the refrigerator. In a hurry? You can thaw it in a few hours in water. Immerse the still-wrapped turkey in a basin of cold water (bucket, laundry tub, cooler, the trunk of your ex's car, etc.). Change at least half the water every 20-30 minutes to raise the bath to about 40 degrees, or use a trickle of running water. Watch the bath temperature to make sure the water is not too warm. Remember the basic food safety rule: No more than two hours above 40°F. If you're brining, you don't need to pre-thaw. The bird can thaw while it wet brines. For a dry brine, you need to thaw just enough to get the contents out of the cavity. Roast in under two hours!Our memories of Thanksgiving include a bird roasting in the oven all day and many recipes talk about three or four hours in the oven. Please don't. A brined, spatchcocked turkey roasts in 50 minutes to two hours for a 10- to 14-pound bird, and a larger bird won't take much longer. You read that right: Just an hour or two. Roast then rest On Turkey Day, plan on getting the bird into the oven 2 1/2 hours (2 hours if the bird is 10-12 pounds) before you plan to serve. That will give you an hour or two to roast and 30-60 minutes for the bird to rest. Resting is good for you and the bird: it finishes the cooking, helps to retain juices, and evens out the temperature. It gives you plenty of time to finish up your gravy and your sides, without stress. You can rest the bird for an hour (even longer if you gently reheat the meat before you serve).
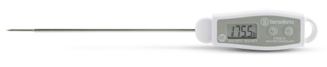
1. Use a thermometer, not a timerWith any roast, the internal temperature is the only reliable way to know it's ready. It's even more so for turkey, with its giant slabs of breast meat that go from delicious to painful in ten degrees. You need to know when it's done, and that means accurate temperature measurement. Time is not on your sideAll cooking time charts and instructions that suggest a certain number of minutes per pound are unreliable. Yes, all of them. Why? Because they don't understand physics. Roasting time is a function of surface area and depth, not of weight or volume. And oven temperatures vary widely. So using time in any way means the recipe has to account for error, which means it's almost certain to tell you to overcook. Most time-based recipes will have you roasting for three hours or more. Guaranteed to ruin your turkey. How about color?"Cook until juices run clear." No, no, no. Color of the meat or the juices is a poor indicator of doneness or of safety. In particular, expect some pink or red near the bone, especially in the leg. As long as the temperature reached target, the meat is safe.
SafetyUntil 2006, the USDA recommended an internal temperature of 180°F — dry, dry, dry. They now recommend 165 (for both dark and white meat) but some sources still reflect the old advice. Salmonella, campylobacter, and other bird-borne nasties are history after less than a minute at 160. Even at 150°F, you're safe after five minutes, so it's not necessary to turn your bird into cardboard. Just make sure your thermometer is accurate (you can calibrate yours). Probe, probe, probeA turkey is not solid, homogeneous meat, so the temperature varies. Take multiple readings in the thickest parts that are not adjacent to bone, and wait for the reading to settle. Best way: Poke deeply into the meat, past the center, and back it out slowly, watching the reading. The lowest temperature you see is the internal temperature reading. And don't worry about the probe hole losing juices. That's a myth. Loss is neglible. Thermogadgetry
No. They're disposable so let's dispose of them right away. Most trigger at something like 185°F, which is way too high. Instead, get yourself a reliable, accurate thermometer. The finest is the Thermoworks Thermapen (and no, they don't pay me to say this). While most so-called instant-read thermometers take nearly a minute to reach an accurate reading, the Thermapen One is there in one second! But it's about $100 so I am not suggesting it. Unless you gotta have it. Then I recommend it, highly. I love mine (an older model that takes 3-4 seconds). It will last a lifetime. The Thermapen uses a thermocouple rather than the slower but simpler thermistor technology. There are now thermocouple-based competitors. I have not tested them but America's Test Kitchen has and found them not quite as good, but a good value.
If the Thermapen is too expensive, I suggest Thermoworks' lower cost models, which include some fast models with a needle-like "reduced" tip. Some are even dishwasher safe at $20-30. There are numerous other models and brands available at supermarkets and kitchen stores. Get a good one; it will last years. For roasting, a food thermometer with a remote probe at the end of a cable is handy. The probe goes into the meat and the read-out is outside the oven. An alarm sounds when target temp is reached. However: don't use this as your sole indicator because it watches just one spot. Instead, set it 20 degrees below the target temp. When the alarm sounds, use your instant-read thermometer to test many places. I use the ChefAlarm from Thermoworks, the folks who make the Thermapen. I suggest their Dot or ChefAlarm models. In particular, their cables are much more durable than the cheaper ones — and they sell replacement probes. There are handy wireless units so you can walk around the house and know what's going on inside your bird! Temp tipsWorried about accuracy? Check your thermometer by measuring boiling water (which is 212°F at sea level; if you're at altitude, look up the boiling point at your altitude); or using an ice bath (ice in water, well stirred), which is 32°F. Placement can result in incorrect readings. The probe tip should be in the thickest part, not touching bone. To be sure, set your probe thermometer's alarm to ten degrees below target, then follow up with multiple readings from an instant-read thermometer. Rest. The bird, I meanNotice that my instructions always tell you to remove the bird before it reaches the target temperature. That's because the temperature will rise after it comes out of the oven (because all that heat is still moving inward, even after the oven's not adding to it). Allow the bird to rest 30-60 minutes before carving. There's some debate about whether resting prevents the loss of juices but for roasts, I want to let the inside finish rising to the final temperature. But even if there were no good thermal reason, it helps with the meal timing. This is the time to complete the gravy and the rest of the meal. Don't wrap the turkey with foil — it softens the skin. The meat will stay hot for an hour, so you have plenty of time. If you need more than an hour, tent loosely with foil and it will stay hot longer. After carving, if the meat is not hot enough, or if there are parts that seem too pink for your guests' tastes, a minute or so in the microwave will fix it.
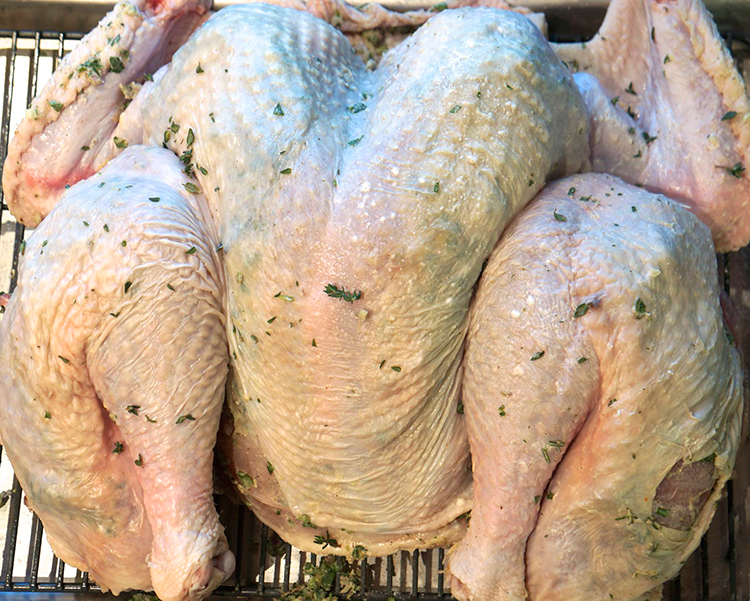
2. Dry-brine (salt) the bird"Brining" is treating the bird to a salty bath for hours or days. My preferred method is the "Judy Bird" — dry brining, without water. It's more convenient but takes 3-4 days. (Since brine is salt water, "dry brine" is a misnomer. Nonetheless, it's common to use the term "dry brine" for this method of salting the bird.) Why salt?Salt is magical. It flavors the meat, amping up the meaty flavor even at concentrations too low to taste salty. More important, it plumps up the meat and makes it hold water, for a moister bird. It gives you leeway on the temperature — brined breast meat is still quite palatable as high as 180 (don't ask me how I know). Which is good, since it is hard to get the thigh to 175 without taking the breast higher than 160. So you must, you must, you must brine (whether by wet or dry means), or buy a brined bird. Dry or wet?Dry brining takes longer but is superior in all other ways. And, you will be thrilled to know that abandoning the wet brine is trendy. Yay, fashion. Tips
Step by Step: How to Dry BrineI first learned about dry brining from an article by Russ Parsons, published in the Los Angeles Times. It's recommended by the the late Judy Rogers, founder Zuni Café. "You just salt the turkey a few days in advance, give it a brisk massage every so often to redistribute the salt, and then roast it." The name is stupid but it worked well for me and is now my regular method. The results are better than wet brining. The meat has more flavor, not at all salty, and moist throughout. And it's much easier. Salt it, place it in a plastic bag, refrigerate for three days, then refrigerate another day (no longer), uncovered. The only disadvantage is that you have to plan 3-5 days ahead. Want to learn more? See "More on Brining."
Step by Step: How to Wet BrineI recommend a dry brine but if time is short, a wet brine takes just a day. (If you crave more detail, see "More on Brining.")
3. Great gravyJust as sauces are essential to fine cuisine, gravy is essential elixr. If great gravy has eluded you, worry not. I will instruct you in the ways of the Gravy Jedi. There is a simple, reliable route to excellent gravy: make-ahead pan gravy. Much of it is done before the bird is ready, even days in advance. Make-ahead gravyWhen: The following steps can be done days ahead, or when you put the bird in the oven. After the bird comes out of the oven, you can add pan drippings to the already-prepared gravy base. Easy! Make ahead
Finishing the gravy
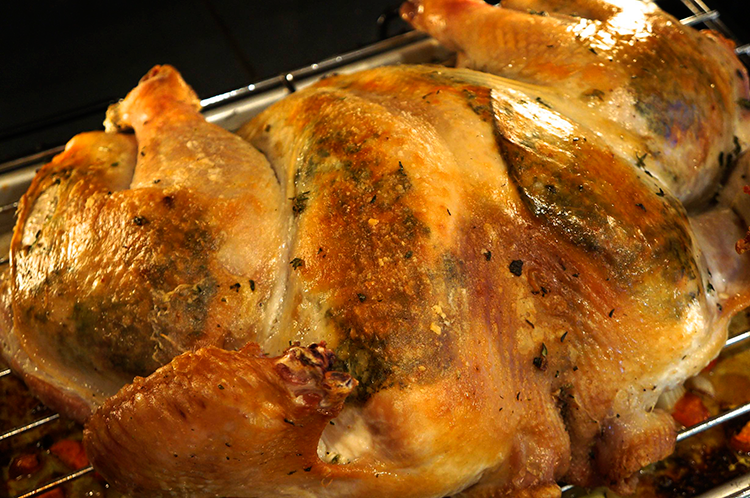
I make at least two quarts (yes, really) of gravy and freeze the rest in ziptop bags. 4. Spatchcock and RoastDecision point here. Spatchcocked or whole? Spatchcocking is better...Spatchcock is a great old Irish word. To "spatchcock" (or"butterfly") a bird, you cut out the spine and flatten the bird. After years of experiments, it's now my preferred method, for several reasons.
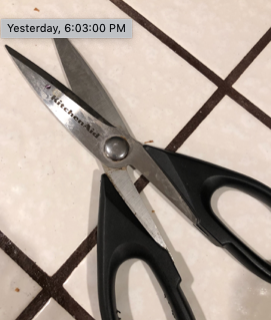
If you have a large turkey, spatchcocking takes some strength and a little swearing but you'll get it. Use a hefty pair of scissors, a cleaver, or a good knife. A handy accessory is a teenager with surplus testosterone. (I saw a video on the Internet of a guy using a Sawzall (reciprocating saw) to saw out the backbone. I love that idea.) Use your shears and your cleaver (or heavy chef's knife) (or your Sawzall) to remove the backbone by cutting along one side, then the other. Shears work for a chicken but once you get to the large bones toward the tail end of a turkey, you will need to hack and chop using the cleaver or heavy knife. Keep hacking -- the bones are big, but fragile, and you will get through. Add the backbone to the pot with the gravy parts. Place the opened up bird in the bottom of the sink, and place both palms on the breastbone, as if you're a TV doctor about to administer CPR. Lean in with your full weight and smash the breastbone to flatten the bird. You will hear a pronounced craaaaack! Do this before the brining step, for an easier fit in the refrigerator.
Or, don't spatchcock...Then there's the picture-perfect Norman Rockwell bird. Pretty. To do that, spatchcocking is out, as it results in more of a Salvador Dali look. Truss?Some classic recipes tell you to truss the bird, tying the legs together. Some even come with a nylon tie that binds the legs:
It's tidy but works against you. Since the dark meat, especially the inner thighs, need to reach a higher temperature, let those legs fly, so the heat can get in there. So, remove the tie. Turn, turn, turnIf you leave your turkey in its spatchless, bulbous form, you need to turn the bird during roasting. The reason is that a breast-up bird exposes the breast to heat and shields the legs. Which is exactly the opposite of what you want. So the remedy is to start the bird upside down. Cook's Illustrated's original method had you start it breast down, then on one side, then on second side, then breast up. I had mixed success with this and it's a lot of fuss, so I turn it just once. Cook's has evolved their instructions and they now do the same. But unless you butterfly, you do need that one turn. Recall the basic temperature rule. The breast-down roasting period shields the breast so it can be ten degrees behind the legs. Foiled again!Don't try shielding the breast with foil, because the skin won't crisp up. Alton Brown on Good Eats disagreed -- he started the bird at 500 degrees, then shielded the breast. It worked for me when I tried it but the skin on the breast didn't brown as well. Brown's current recipe omits the foil, so he must think I'm right, even though he forgot to call me and say so. It would have been the gracious thing. And his recipe has 5500 5-star reviews on the Food Network website. Mine doesn't. And yes, Brown brines his bird. All turkey-masters do. Roasting InstructionsOK, you've come this far! We have our brined and ready bird, our gravy preparations, an accurate meat thermometer and we're about three and a half hours from dinner time (because we know that roasting will be under three hours including the rest). Ready? Here we go.
5. Buying a good turkeySize mattersA really big bird is hard to cook well. 10-12 pounds is easy to handle and cooks well. In any event, stay under 14 pounds. Cook's Illustrated developed a recipe for 20-pound birds that serves 20-24 people but I would rather do two smaller birds. For 18-22 pound birds, their basic method is:
Brined or not?You can buy pre-brined birds or brine them yourself (as explained in step 2). Birds that are labeled as kosher or "packed in a solution," or list sodium- or potassium-based ingredients, are brined. The advantage of a brined turkey is that it saves you a step and if you're buying your bird the day before dinner, you won't have time to brine it. The disadvantage is that you have no control of how salty the bird is. In particular, I found kosher turkeys to be too salty. The biggest advantage of doing it yourself is that you can dry brine. Commercially brined birds are wet brined, which adds water. Dry brining concentrates flavor and makes a tastier bird. Frozen? Fresh? Heritage? Which brands?Frozen turkeys do as well as fresh in tests and I have had success with average supermarket birds as well as fancy-name fresh ones, organic, and free-range birds. Frozen birds are more likely to be pre-brined. A top-rated turkey is the plain old Butterball. Most (but not all) Butterballs are brined. I have used them twice with great success. Despite a lot of kudos in some magazine tests, I no longer use kosher birds. The main reason is that they are very salty — in at least one case, horribly so. A minor drawback is they are not cleanly plucked. (A spokesperson for Empire explained to me that this is because the Kosher laws do not allow the hot water dip used by most processors to loosen the feathers.) A Kosher bird will have small pieces of feathers. They are a bit off-putting but don't affect the flavor. I pull the larger ones. The second complaint is that Kosher birds don't have any giblets or wing tips, which are part of my gravy-making. All you get is the neck. So far, I give the nod to good old Butterball, or whatever Costco or Trader Joe's has. Spare PartsWhile you're at the market, pick up some extra parts: A couple of necks, wings, or backs, for the make-ahead gravy. This is most important if you're cooking in a way that makes pan drippings unavailable, such as smoking or grilling. Heritage BirdsA lot of gourmets are turning to "heritage" birds — the original breeds before the Dolly-Partonizing of modern breeding. I haven't tried them yet. Early reviews were mixed but recent reports sound enticing. The heritage suppliers have achieved better consistency. But they are pricey and need to be bought by mail. If you can suggest one that is available in the Bay Area, let me know: MORE
So, how did you do?If you use these notes, I would love to hear from you! Contact me: .
FAQsQ: My gravy is way too salty. Can I recover? (via Facebook) Probably not. If it's a little too salty, you can make more and dilute it but you might just be throwing good gravy after bad. If you have a cooked turkey now, break it down and throw whatever's not meat into a pot with onions, celery, carrot and make soup. Then make gravy from that. When you're done, you will have a no-salt gravy (which will taste bland) and you can mix a little of your salty gravy in at a time until it tastes right, then toss the rest of the salty batch. Q: "I've used your tips and instructions many Christmases and Thanksgivings now..." (Paul and many others) Q: I was enjoying reading through your turkey tips again yesterday before roasting my bird. Another great dinner, my first following your gravy method with the browned parts simmered in wine and sherry, then pureed. Added the anchovy paste and thought it was my best ever. Hope you feel well enough soon to make your own epic dinner! Your site is excellent, which is why I visit it annually. Entertaining, too. Both my sons told me they use and like it, too. So thank you for all you've put into making it so good! (Mark) Thank you, I love hearing that. Send me pics of your successful brids! Q: Should I brine? Wet brine? Dry brine? (Many readers) While dry-brining is best, in the end, any brining method will work wonderfully. You can buy a pre-brined bird and you're done. I prefer to brine it myself because I never know how salty a pre-brined bird will be. Q: I want to brine. When should I start? (Many readers) The timetable tells all! Q: How big a turkey do I need? (Cousin Judy) A pound or two per person, depending on how you feel about leftovers. (Each pound of bird will deliver about 1/2 pound of meat.) But above 14 pounds, it becomes harder to get the doneness right as the birds get bigger. If your oven can handle it, two 12-pounders are better than one 24. Or maybe you grill one and oven-roast the other? Q: My family likes stuffing... (Bobbie) Stuffing is great! But not inside the bird, please. (Technically, that makes it "dressing," but I will still call it stuffing.) Packing material inside the cavity introduces serious food safety issues and makes it harder to get the temperature of the meat right. And I don't believe that stuffing picks up flavor from the turkey cavity. Bake it in a separate pan and mix in the drippings from the roast to get the meaty flavor. But if you insist on having it inside the bird, there is a way. Put the dressing in a cheesecloth cloth bag, microwave it so it is quite hot, and then place inside the bird. More... Q: Why do you discard the liver? (Adam) Good question. I really meant not to include it in the gravy components. If you like liver, by all means use it for liver applications. Just don't use it for the gravy. Q: I brined my pre-brined turkey! Am I hosed? (Elizabeth, Stacy, Denise) Probably not. A turkey can't be any saltier than the brine solution. A normal wet brine will likely not add a lot more salt. A dry-brine will, but probably not a lot. What I would do is rinse the bird thoroughly. If there is time, you can do a low-concentration wet brine (1/2 cup table salt per gallon of water) overnight. If the turkey is saltier than the brine, then some salt will leave the meat, because the brine is less salty than the meat. And one important note: Brining is a very forgiving process. You can be off my quite a lot. So I think you will be OK. I asked Denise: "I haven't tested these ideas so if it happens to you, let me know what happens." She replied that the time she brined a pre-brined Butterball, she was worried that it would be too salty but it was not. Q: My buddy thinks brining is only for frozen birds and not for the "choice" freshly processed heritage birds. Do you have an expert opinion? (Ken) Brining makes sense for all turkeys (and, for that matter, other poultry and pork). Note that brining, when done right, does not make the bird very salty. Over-salting would indeed be a shameful way to treat that very expensive heritage bird. I would not wet-brine a heritage bird because wet brining dilutes flavor by adding water. Dry brining, on the other hand, uses the meat’s own water and does not use a lot of salt. Cook's Illustrated developed a heritage recipe and did their usual exhaustive work. They recommended a dry brine. If you choose not to brine, roast carefully and pay close attention to internal temperature, because unbrined birds have less fat and therefore, less leeway. Q: What do I do if my family has decided to get our thanksgiving, including the turkey, from Marie Callendar? (Daniel) You need a new family. Q: It's Thursday morning and we just discovered the garage refrigerator's door was open. The turkey is at 58°F. (John) I had John use a probe thermometer and internally, the meat was above 50. The FDA warns that perishable food not be in the "danger zone" of 40-140°F for more than two hours and poultry is especially dangerous. John went on a tour of local markets and ended up with a couple of turkey breasts and thighs which they roasted and arranged on the platter. Just like Julia Child did... Q: Most of the machinations here are to get around the fact that breasts and legs have different cooking requirements. What if I cooked them separately? Yes, that's a great method. Julia Child did it that way. Q: I have these kitchen shears and am worried about whether they are up to the job of spatchcocking. Should I run out and buy the top-rated ones? (Steve)
Shears are great for chickens, but for a turkey, you generally need a combination of shears, big knife, perhaps a mallet, and some swearing. But you happen to have the best tool of all: A teenager full of testosterone. Tell your son you think he can’t do it. Q: Can the roux be made a couple of days ahead like the broth? (Christine) Yes. Q: Can I deep fry a turkey in bacon fat? (Joe) I hope so! Joe wasn't serious but it did get us thinking about doing it in lard (only because neither of us could think of a practical way to acquire a couple of gallons of bacon fat). Q: Can you braise the turkey? (Léo) Braising is great for tough cuts that are full of collagen — turkey legs would qualify and I have done this, though never for Thanksgiving. I would never braise the breast. But two others whom I trust have: Mark Bittman's Braised Turkey, in the New York Times: Mark cuts up the bird, browns the pieces in a skillet, and braises in an uncovered pan. He puts the legs in first, adding the breasts later since they require less cooking. Michael Ruhlman's Braised Turkey (derived from a method developed by chef Doug Katz) does the whole bird in a roast-braise. The whole turkey sits in liquid so the legs braise while the breasts roast. I recall that one of the top chefs (Thomas Keller?) had a method in which the turkey was roasted with legs and breasts separate and since the legs take longer, they were finished in a braise. Q: What bird should I buy? (Denise) The only bird I would not buy is a kosher turkey, because they are so salty. (And I could be wrong: lots of sources love the kosher birds.) Beyond that, my experience is that the turkeys are all good. Some will be a bit better but you can't go very far wrong and the most popular bird out there — the plain old Butterball — is a great choice. Q: "I am making Thanksgiving dinner this year and honestly feel a bit nervous." (Denise) Yeah, I hear you. It's the big day and all eyes are on the cook! If you're really worried, go buy a pack of turkey thighs and a pack of breasts and brine and roast them. Get them to the right temperature and see what you get. Or, just jump in. Take it a step at a time. If your relatives give you a hard time over the result, they need a reminder about why we have holidays. Q: "I have been using Alton Brown's method. Your thoughts on it?" (Denise) I love Alton Brown. He's one of the best recipe writers in the food world. His turkey recipe is 5 stars with over 5500 reviews for a reason: It’s a great method. A couple of differences I would suggest:
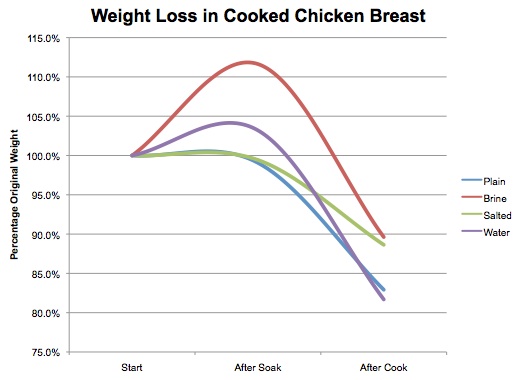
Q: When should I rinse the bird? If you dry brine, don't rinse (especially if you left the bird unwrapped for the last day, to dry the skin, since rinsing, duh, wets it.) After a wet brine, rinse to remove excess salt. You can also rinse it when you unwrap your turkey... Q: Waitaminute! I read that we should not rinse poultry because it spreads bacteria. A widely-reported study claimed that rinsing splashes bacteria around your kitchen. Makes some sense. Or would, if it were true. Reporting in Lucky Peach, Harold McGee found the paper and said they had the flimsiest research. They rinsed dyed meat and noted splatters of color in the kitchen, but only when they were sloppy. McGee did more thorough testing. His finding: if you rinse in a torrent of water, like an animal, you may splash bacteria around. But who does that? Unfortunately, Lucky Peach never published online so the finding is not well known. Later studies seemed to confirm there's some bacterial danger but I think it's ok, as long as you rinse gently, with the food in the bottom of the sink. Or don't. It doesn't matter much. Q: Wait a minute. How can dry brining make as moist a bird as wet brining, which is, duh, wet? (Brad) Great question. The simplified answer is that with wet brining, water is absorbed, but most of the added water weight is lost during cooking. Dry brining introduces just salt which helps retain the water that is already there (and as you know, raw meat has plenty of water). So after roasting, the water weight of both methods is about the same. Longer answer: Dry brining (salting) and wet brining do the same thing. The sodium and chlorine ions that immediately declare themselves free agents once salt dissolves in water are small and frisky. They move surprisingly quickly into the flesh, adding flavor and altering the protein to make it hold water. They bind water to proteins so that the meat holds all the water it can. You can soak meat in plain water and it will gain weight but as soon as you cook it, the added water is mostly lost. Salt (sodium ions) unravel proteins and help bind the water. In wet brining, the meat gains water — but it is tap water, which dilutes the meaty flavors! In the case of dry brining, the water already in the meat is held there. Raw meat has plenty of moisture and if we can simply retain that, we have a very moist end result. Dry brining does that without adding water. Serious Eats and Cook's Illustrated have both tested this and their results were the same. Check out the Serious Eats article, especially this graph. Notice how the "salted" (dry brined) sample matched the brined sample after cooking:
Source: SeriousEats.com
Additional notesCarvingCarving the turkey is scary to many people. Understandable, especially if it's done in a grand display in front of all your guests. Instead, do it in the kitchen and arrange everything symetrically on a platter where it can come to the table in a celebratory moment. Plus, you, the chef, get to nibble on the tail and other tasty bits -- what Thomas Keller calls the "cook's rewards." Hints:
High-Heat RoastingImagine roasting at 550 degrees instead of the usual 325! That's the idea behind high-heat roasting or "high-roast." I have tried it three times, twice following Chef Marc's instructions, once more following a Cook's Illustrated article. I have also done other meats at high temperatures. High-roast delivers some great browning and speeds things up but is hard to control with turkey's large mass of heat-sensitive breast. It works much better for chicken. GrillingOf course you can grill turkey! It turns out well but you miss the pan drippings, so the gravy suffers a little. You can put a drip pan under the grate (in the middle, where you have no coals) if you are doing indirect grilling. For grilling, I hand you over to the Authority, Meathead. SmokingTurkey takes smoke beautifully. I've never done genuine smoking of a whole turkey (which is an all-day, low-temperature affair) but I have added smoke during a normal two-hour grilling and it works very well. It's not really Thanksgiving tradition though. And do you really want ten pounds of smoked turkey? I like to smoke turkey parts other times of the year. Note that it's impossible to get the skin crisp at normal low-and-slow smoking temperatures around 250°F. It comes out rubbery and barely edible. If you want proper skin, then you have to boost the heat for at least part of the time. Since most of the smoke flavor happens pretty quickly, you can cook low and slow for an hour, then raise the smoker to 325 (or move the turkey to the oven or the grill to finish). One friend, Dave, hot smokes a turkey and says that if you use a pan to catch the drippings, you get a wonderfully smoky gravy. FryingIn 2006, I finally fried a turkey and did it again a few years later. It's very fast and works really well. The method has potential but I had a few issues.
Vertical roastingThere are various vertical roasting products on the markets and my friend Linda swears by (actually, raves about!) a clay upright, the Cocorico. I have not tried it and wonder if my oven would accommodate a turkey in the upright position. She says it's tight — she has the rack at the bottom, sticks with an under-14-pound bird, and it means the oven is not available for anything else. I saw George Duran do beer-can-chicken with a turkey (using a Foster's Lager's 24-oz can). I like beer-can chicken but I'll not be trying this one. I don't like Foster's that much. Dressing (stuffing)Stuffing the bird is a food safety no-no because the stuffing won't reach a safe temperature (unless you badly overcook the breast meat). Tests show that the stuffing doesn't really pick up any flavor from the turkey. So make your stuffing but bake it in a separate pan (where, technically, it's called "dressing"). If you want turkey-flavored stuffing, cook it with some extra turkey parts or mix in some turkey broth or pan drippings). But if you really, really want to stuff the bird, pre-heat the stuffing. Put the dressing in a cheesecloth cloth bag, microwave it to 160°F, and then place it inside the bird. If you want, cook half the dressing inside the bird and half outside and do your own taste test! Serious Eats and Alton Brown offer recipes for turkey with stuffing. SpatchcockingNow part of my recommended method. Serious Eats is a huge fan of this. Check out their method. 150? Really?It is curious that many authoritative sources differ on what is probably the most important factor, the internal temperature of the meat at the end of the roast. Folks I follow and respect, and who test like crazy, like Cook's Illustrated / America's Test Kitchen, have said to remove it at 165°F in the breast. So does the US Department of Agriculture. Alton Brown says 161. J. Kenji Lopez-Alt at Serious Eats, Harold McGee, and I say 150. The internal temperature continues to rise after you remove the bird from the oven, by at least 10, and usually more like 15°F. So cooking to 165 means it cook to 175 or 180 and will be considerably drier. Still edible, especially if you brined, but not great. And guess what: as Kenji reports in Serious Eats, as long as the meat reaches 150 and stays there for at least 4 minutes, it's safe. By all means, do what makes you feel comfortable. And especially avoid anything that tells you to cook a certain number of minutes. Internal temperature is the only reliable metric.
More on BriningHow long do you brine?The dry brine process takes 3-4 days plus a day or so to dry. A wet brine can be short or long. Short brines use a higher concentration brining solution, with more salt. Both work well but I prefer the longer brine because with more time, the salt penetrates deeper and since the water has less salt, you are less likely to wind up with overly salty meat near the surface. Cook's Illustrated has a detailed brining formula with variations for longer and shorter brines (or at least, they had one — they keep moving their links around). I use 2 cups of kosher salt or 1 cup table salt per gallon of water for 8-12 hours; or twice the concentration for 4-6 hours. You must keep this at under 40 degrees. You might also wonder what vessel to brine in! If you don't have a pot big enough for a turkey (3 gallons), an ice chest is a good choice because you can add ice daily, to keep the food safety police at bay. (Remember: no more than two hours in the 40-140 danger zone). When you're finished, rinse the turkey well, to remove surface salt. Then — important tip — dry the bird very thoroughly and, if you have time, leave the turkey unwrapped in the refrigerator for a day (no longer — Kenji says that makes the skin tough). Drying means crispier skin. Benefits of brining
Dry brineDry brining worked at least as well as wet brining, with less fuss. The methods in the main article detail it. Wet brining adds water, which dilutes the flavor. With dry brining, salt draws moisture from the meat and it is then reabsorbed with the sodium ions that will make the meat retain moisture through cooking. In side by side tests at the Los Angeles Times, Russ Parsons reports that the panel preferred dry brined turkey by a landslide. The only disadvantage is that it takes three days; wet brining can be done in a day. Science lesson: How does brining work?Inquiring minds want to know: How does brining work? Geek alert: This is hugely nerdy. Does it work?First question: Does it really work? Does water really go deeply into the meat and does it stay there through roasting? Cook's Illustrated did tests, comparing brining to a water soak and an unsoaked control. Plain water hydrated the meat just as well but brining made it stay there. Brining and soaking both added 6% to the weight. After cooking, a pound of untreated meat weighed 0.82 lb., water-soaked meat ended up at 0.88 lb, and brined meat was 0.93 lb. Kenji of Serious Eats reported very similar results in their brining tests. What that means is that brining works. Not only does it add moisture, the extra moisture stays through cooking. How does it work?I did a lot of research and no one really knows how brining works other than the agreement that it's not osmosis. It's believed that salt interacts with the structure (probably by denaturing proteins) in a way that helps retain water. What's especially unclear is whether the water plumps up the cells or the water is held between cells, like a loosely coiled towel. Best explanation I found was from Modernist Cuisine: "Brining technically does not work via osmosis, as popular opinion suggests. If osmosis alone were at play, water would be drawn out of the meat, but brining works by pulling water into muscles. Chloride ions from dissolved salt diffuse into muscle fibers and accumulate along the surfaces of protein filaments. As these ions increase in number, they generate a negative charge that loosens and pushes neighboring filaments apart. This newly created channel provides enough space for water to enter the muscle, causing it to swell from the influx of ambient water. Ions further modify muscle proteins by causing them to bind tightly to water and resist shrinking as the meat cooks. Muscle will continue to swell until the salinity reaches 6%—after that, it shrinks and begins to lose water." How much sodium?How much salt does brining add to the food? The amount is significant but not massive. Geeky details first: I have seen some discussions guessing at mechanisms and amounts, nothing iron-clad. If the added water is similar in concentration to the brine, then an 8 oz serving of meat, which normally contains 120 mg of sodium, has an additional 0.09 tsp of salt, or 225 mg added by brining. That's 350 mg for a half-pound of turkey meat. A slice of bread, an English muffin, or a pretzel rod has around 200 mg. The USDA recommended daily intake is 2400 mg and for low-sodium folks, 1500. So it's significant but not greatly so, especially given that it's one of the two great eating holidays. DepthTests by Greg Blonder of Amazing Ribs showed that sodium and chlorine ions penetrated a pork loin around 1/4" after one or two hours and 1/2" after 8 hours, but just a little further (0.67") after 24 hours, suggesting perhaps diminshing returns after a day. He hypothesizes that salt might diffuse further and faster in chicken and fish, which are more porous. Flavoring the brineWhat about recipes that add sugar, herbs, cider, and juice to the brine? Go ahead, if you want, but it doesn't work in wet brines. I had this argument with a friend. Using flavors in the curry family of spices, he reported the brine flavors carried through to the finished product, but then we did a bit of surgery. The flavors were indeed present — but only at the surface. Sections of deeper meat had only salt. It makes sense — sodium and chlorine ions are tiny and as ions, have a transport mechanism. Herbs, sugar, and apple cider are much larger and lack the ionic action. If you don't believe me, believe Serious Eats, Amazing Ribs, and Cook's Illustrated. Their results agree. For those who disagree, there is no harm in it. If it makes you happy, flavor your brine. But you will get more oomph if you save the herbs for after the brine. Or, inject them if you want penetrating flavor. Dry briners, go ahead and add herbs and sugars. It all sits on the meat until roasting so you can add them at any time. Ways to Cook TurkeySomeday I'll have tried them all:
FeedMeMy food blog, FeedMe, carries a blow-by-blow description of my turkeyheaded adventures.
|
Questions
or comments?
Contact me:

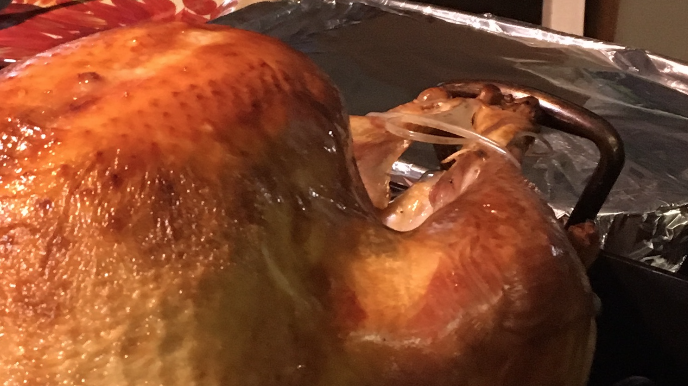
 If temperature in the breast is the gauge, how about those handy pop-up thermometers that come implanted
in some turkeys?
If temperature in the breast is the gauge, how about those handy pop-up thermometers that come implanted
in some turkeys?